
Today I got inspired to write a blog post that’s a bit different than anything I’ve ever done. I thought I would show you a little “behind-the-scenes” look at my flatlay-taking process! I’ve seen a handful of other bloggers do posts similar to this, and it always amazes me how different everyone’s process is. It’s kind of cool to think that we all take such different approaches to the same thing.
Anyway, so while I was taking flatlays over the weekend, I decided to snap a quick photo of the area surrounding my setup. I figured it would be the easiest way for me to go through everything, and, if you’re a visual person, get a better sense of what I’m talking about.
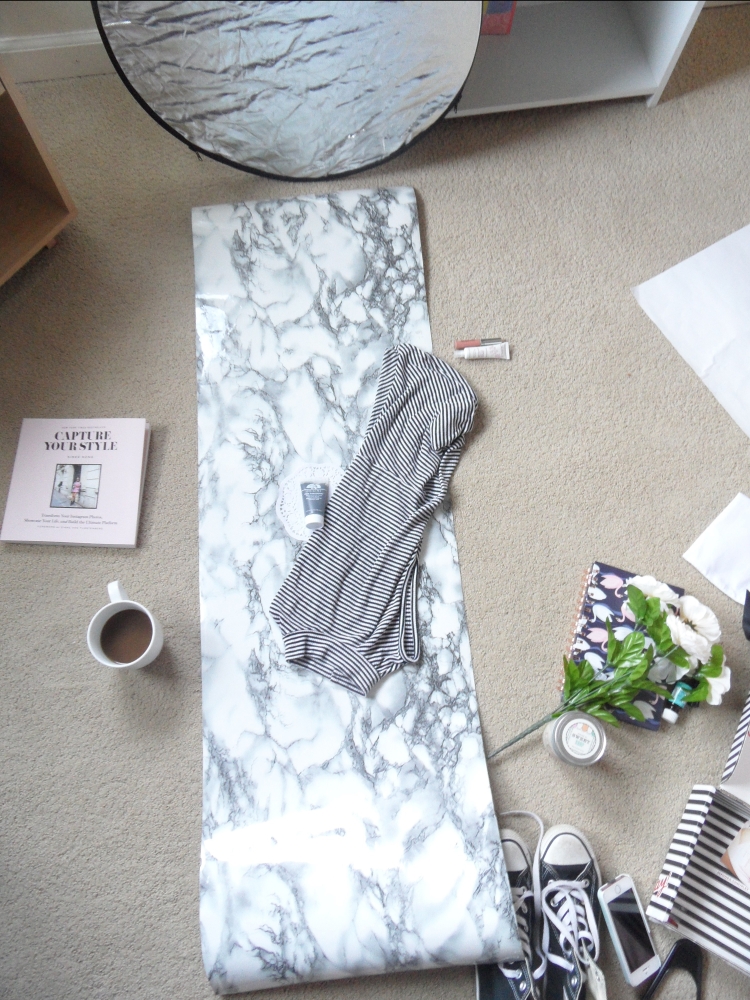
As you can see from the photo, taking flatlays is a pretty dysfunctional process for me! I once saw a tweet that described the process of setting up a flatlay as gathering everything you own and throwing it on a piece of marble, and I couldn’t agree more with statement.
The first thing I do when I begin a flatlay session is grab a variety of props. I try to find a hodge podge of items, ranging from books and magazines to beauty products and coffee mugs. It’s helpful for me to have a diverse mix of props to work with. Plus, it means I’ll spend less time running around trying to find the last addition to a photo later on.
Once I’ve got my spread of props in front of me, I focus on lighting. Finding a bright spot to take flatlays is very important when you use natural light. I like this corner in my house because it is directly under a set of windows.
Next, I set up my reflector. If you’re a blogger struggling to get good lighting in your flatlays, I strongly recommend investing in one of these. Reflectors are great for giving your photos that extra bit of brightness, especially during the dreary winter weather. I got mine off Amazon a few months ago, and I don’t think it was more than fifteen dollars.
Before I start setting up flatlays, I like to take a couple of blank shots to check out the lighting. Something I’ve learned from experience is that things turn out completely different on camera than they do in real life. You may think you have good lighting in shot, but your camera may tell you otherwise. You don’t want to waste time setting up an intricate flatlay only to discover it’s too dim to take photos. It’s happened to me countless times, and I can tell you it’s not fun.
After I’ve got the lighting situation all sorted out, I moved on to actually putting together the flatlays! Everyone has their own approach to setting up a shot, and mine simply involves playing around with the angles until I find something I like. It can definitely get messy and involved a lot of moving and maneuvering, but I’m always happiest with my flatlays when I take the time to do so.
And that concludes this post! Sorry it’s a short one today. But I really just wanted to focus on the photo. I hope this gives you a better idea of what goes “behind-the-scenes” of one of my flatlays and illustrates the fact that it really is a messy process.
Do you take flatlays? If so, what’s your process like?
Sincerely,


Neat! I really like your marble background. I’m very similiar in my process. Usually I grab a variety of items and try different layouts with them. I take a “birds eye view” shot and usually on a white background. I don’t have a reflector, but I try to use a flat lighting to minimize shadows.
LikeLike
Nicely set up, i’m trying to think back if i’ve ever done flat lays 🤔, maybe i can’t remember haha. However it makes items in photos look really good
LikeLiked by 1 person
Thank you! 🙂 they really are a lot of fun to set up!
LikeLiked by 1 person
You’re welcome, sure it is 🙂 xo
LikeLike
This is so cool – I find posts like this really interesting as, like you say this is a behind the scenes! Thanks for the reflector idea 🙂
LikeLike
Reblogged this on MacquillageWithLeilani and commented:
Check out this post from CurrentlyLately – I love behind the scenes stories to the perfection that we as bloggers try to get in to our content!
LikeLike
I am the worst at taking flatlays! Thank you for the tips 😀
LikeLiked by 1 person
You’re welcome! I’ve definitely had my struggles with them as well!
LikeLiked by 1 person
this was so helpful, i have reflectors but I dont use them that much, I need to
LikeLiked by 1 person
Thank you! I’ve had reflectors for a while but I really didn’t start getting into using them until recently! They’ve been working wonders for me on dreary days!
LikeLiked by 1 person
I do! It really just look a lot like yours haha. I’ve thought about doing posts like these, but just feel like y space doesn’t look as glam as others. I also use contact paper. How do you use your reflector? Like do you prop it up on something?
LikeLiked by 1 person
I have a bookshelf that I prop it against! 🙂
LikeLike
Great post! I might have to invest in a reflector, I currently use a ring light mirror to add some extra lighting!
LikeLike
This post had me cracking up. About half of the photos I take are flat lays and I understand the struggle. My biggest challenge? SUNLIGHT!! Also – I take about 6 million photos then delete them all then start over… it is a P-R-O-C-E-S-S.
LikeLike